
My Secret Method to Install a Plate Wall
An easy step by step tutorial to install a plate wall anywhere in your home with eclectic plates for a charming grandmillennial look!

I love a good gallery wall, especially when it showcases antique plates! For me each of these ceramic beauties is its own little work of art.
What better way to display them then on a prettily arranged plate wall in my grandmillennial style dining room?
Today, lovely peonies I’m sharing with you my secret method to install a plate wall that is hassle free and will prevent a dozen mistake holes from being nailed into your wall!
What’s the secret you ask?
Well, I create a paper layout template, using wrapping paper with a measuring grid on the reverse!
Let me show you, but first here’s the progression of this little wall in my dining room above my navy rattan bar cart:


The gallery of plates add so much life and personality to this little space. I’m just thrilled with how it turned out!
Tutorial to Install a Plate Wall
Tools & Materials:

You will need a hammer, scissors, measuring tape, level, plate hangers ( wire mounts, disc mounts), picture hooks, painter’s tape, wrapping paper with measuring grid, marker, and of course a variety of plates.
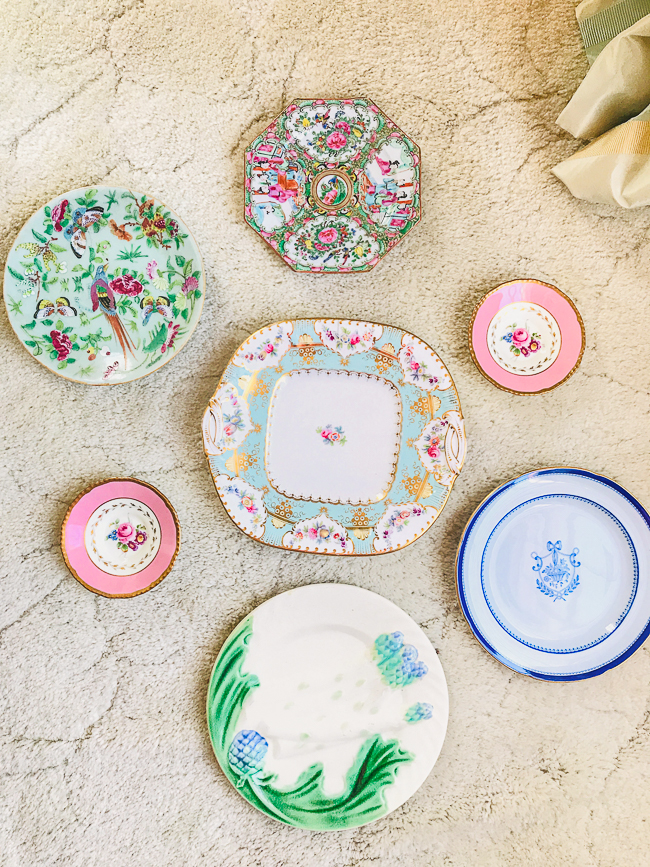
Step One – Pick your wall, gather your plates & play with the arrangement.
The important thing here is to create an arrangement that fits the space and showcases the plates. Consider the width and length of the wall space and the level of symmetry you are looking for as well as the shape of your plates.
For my dining room plate wall the space is narrow and long, so I decided to create a diamond shape layout with a central line of three plates, placing the largest in the middle. I played with the plates on the floor below the wall where I would hang them, so I could easily visualize them in the space.
Color and pattern are also important considerations if you are using an eclectic grouping, instead of one china pattern or style. The colors should harmonize together. Avoid positioning two busy patterns close together. In the final layout, I moved the blue Spode plate to the top with the Rose Medallion to separate busy patterns.


Step Two – Measure your space & cut the wrapping paper.
Measure the height and width of the space on the wall you want your plate arrangement to fill. Then cut your wrapping paper to this size using the grid lines on the back to get straight lines. Be sure you are starting with a straight line too.
Take a moment to measure the grid lines on your paper. Mine were one inch, which is pretty standard. This will be important in a moment.


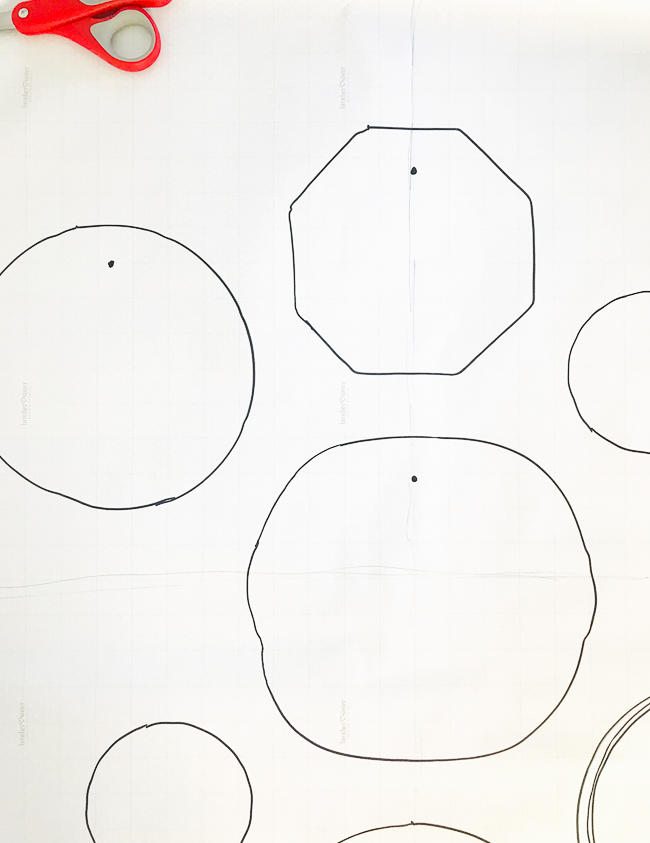
Step Three – Arrange plates on paper, creating a layout template to install plate wall.
First find the center of the paper and mark the horizontal and vertical center lines. Then place your main plate there. Next position your other central plates, and finally place the outer ones.

Use the grid lines to get even spacing between plates. Where the plates were at a diagonal, I also measured with my tape to make sure spacing was even.
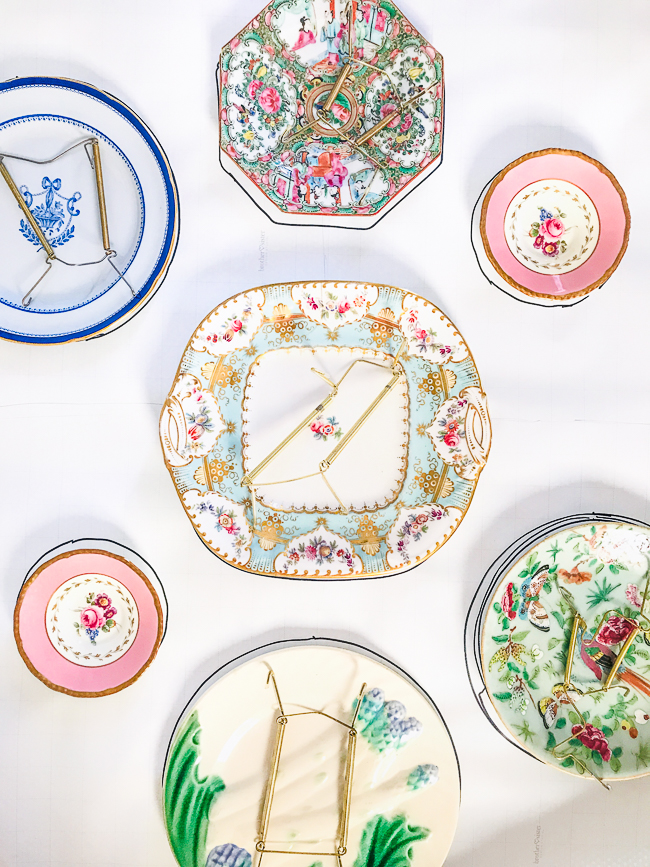
Step Four – Trace the outline of the plates onto the wrapping paper.
Once your arrangement is finalized take a marker or pencil and trace around the outside of the plate. Be sure to angle your pencil in a little to get a more exact measurement of the plates.
When I measured my plates and the traced circles, there was a slight 1/8″ difference. This won’t matter too much in the end, but you can compensate for it a bit in the next step.
Then put your plate hangers on the plates. Make sure you get the type with the rubber tubing cover, so that your plates don’t get scratched and gouged.


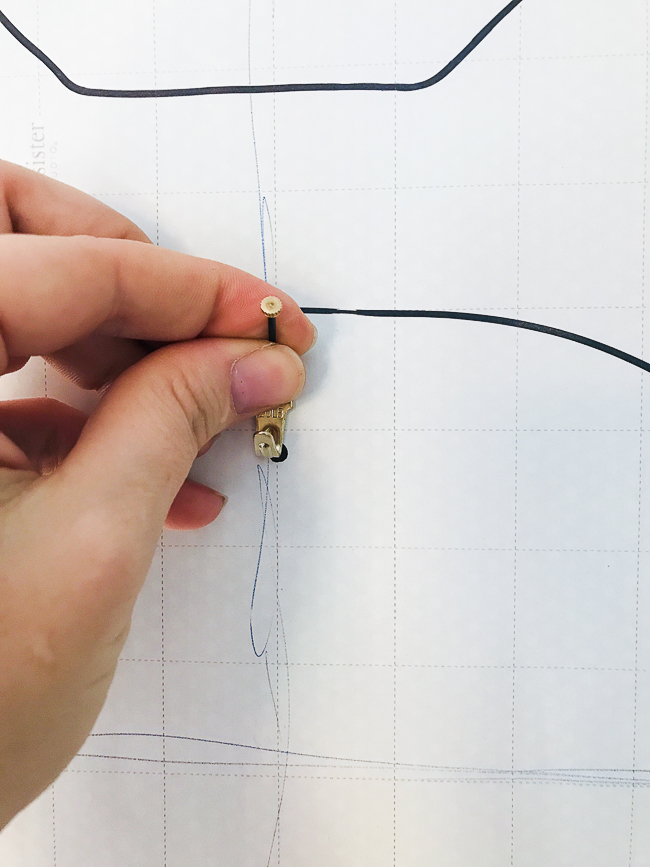
Step Five – Measure & mark the hanging hook on template paper.
Measure the space between the plate hanger and the top of your plate. Then from the top center of the outline on your template paper mark this point. Use the grid lines to help you find the center. The mark is where the hanging hook will need to be placed on the wall.
To compensate for the outlines being a touch bigger than the plate, I moved my tape measure down inside the line of the circle.


Step Six – Hang paper layout template to wall.
Decide where on the wall you want to hang your paper layout template. I centered mine within the space and put the top of the center plate at the halfway point. Lightly tape paper layout template to wall.
With a level at at the top of the template, make your template level on the wall. This takes a bit of maneuvering. I recommend working from the top down, and smoothing out the paper to then tape the bottom down.
Step Seven – Nail hanging hooks into wall using marks on template.
Place the hook part of the hanger on the mark you made earlier. This accounts for the dropdown difference between the nail and the hook. If you are just using nails, then you would put your nail on the mark instead.
After nailing in all your hooks, remove them from the wall and take down your paper template. Then push the hooks and nails back into the holes you created.


Step Eight – Adjust plate hooks & hang plates!
I recommend bending the hook part of the wire plate hanger out from the plate for easier hanging. For smaller plates, you can use these Disc plate hangers. They have an adhesive activated by water, so you do have to allow several hours for them to set up before hanging.

Here are all the details for my dining room transformation!

Just look how pretty this collection of antique plates are in my grandmillennial dining room! I love the bright pastels, the whimsical florals, and touches of pink. This plate wall really combines all of my favorite china pattern styles:

Shopping sources for my traditional dining room plate wall:
- Blue Copeland Spode Newburyport pattern
- Sèvres style cake plate – this square ribboned one is pretty and I like this Royal Worcester one too
- Sèvres style butter pats – these Limoges monogramed ones are chic or these transferware scenes would look lovely on a wall
- Majolica asparagus plate – this is a beauty!
- Famille rose celadon – similar here
- Rose Medallion – this Mandarin plate would look amazing on a wall or check out this unique leaf shape
So how easy is that? Just 8 steps to hang a lovely plate wall with eclectic antique plates! My wrapping paper with grid lines is the secret tool you need to make this installation easy peasy.
Let’s be pen pals! Sign up for the Rare Find for exclusive content, discounts, and more delivered straight to your inbox.
Hi there! I'm Katherine...

the curator, writer in residence, and decorator behind Pender & Peony.
I’ve decorated my entire 1960s brick colonial with secondhand finds and antiques on a budget without sacrificing style, quality, or comfort.
You CAN have a traditional home with timeless charm on a budget too!
The problem isn't your taste -- it's an industry that glorifies the next big trend and only showcases high end custom design.
That's why I created The Collected Room Method to teach you my approach to the collected interior!
So bright and cheerful! Love the way they mimic the patterns on the table. Very purposeful yet eclectic at the same time. I love the look.
Thanks so much Mary! I love colorful pastel decor!
Great use of color on your plate wall and throughout the room. Thanks for the helpful tutorial. I’m one of those people who tweak spatial layout until it’s just the way I want it–now maybe I can avoid making so many extra nail holes!
Yay! Hope it helps. Thank you.
I have 3 bird collector plates, all the same size , 1 small mother day plate and grandmother tree plate . trying to figure out a plan to put on the wall.